108 Getting started with Blogdown
Written by Annie Collins and last updated on 30 January 2021.
108.1 Introduction
blogdown is an R package that allows you to create websites and blogs using your knowledge of R Markdown. If you have never made a website before, blogdown is a simple way to get started. Even if you are experienced in building websites, blogdown’s R and R Markdown compatibility makes it highly tailored to presenting statistical work, including equations, visualizations, and modelling. It is also highly adaptable, allowing you to easily convert your work to other supported formats like PDF.
Websites can be a key tool for showcasing your work to future employers or educational institutions, which is why working with blogdown is becoming more and more of a key skill set for R users.
In this lesson, you will learn how to:
- Create a website using GitHub and
blogdown; - Edit and update your website’s content and design; and,
- Make your website publicly available on the internet.
Prerequisite skills include:
- GitHub account and general familiarity.
- Knowledge of R Markdown.
108.2 Set Up
Before getting started with blogdown specifically, you will need to set up GitHub and an R project to facilitate your new website. To do so, create a GitHub account (if you don’t already have one), create a new repository, and set up an R project using Git version control. There are previous lessons on all of these steps to help you get started.
Now that you’re in RStudio, you will likely need to install blogdown. You can do so in the same way as other packages from CRAN, by using the code below.
install.packages("blogdown")
library(blogdown)
Next, you must install Hugo. Hugo is an open-source static website generator upon which blogdown depends. You can think of it as a way to translate simple R Markdown files into nice looking and functional websites. Installing Hugo is easy and there is a built-in blogdown function to help you do so.
blogdown::install_hugo()Once you have both blogdown and Hugo installed, you are ready to create a website!
108.3 Creating a new site
The command to create a new website in blogdown is new_site() which takes several arguments. It is important to execute this command in a new and empty repository/directory since it will create a set of files that work together to produce your website, as well as all its different pages. We are going to start with using the default values for all new_site() arguments.
new_site(
  dir = ".",
  force = NA,
  install_hugo = TRUE,
  format = "yaml",
  sample = TRUE,
  theme = "yihui/hugo-lithium",
  hostname = "github.com",
  theme_example = TRUE,
  empty_dirs = FALSE,
  to_yaml = TRUE,
  netlify = TRUE,
  .Rprofile = TRUE,
  serve = if (interactive()) "ask" else FALSE
)
If you execute new_site() using the default arguments (exactly as shown above), you will be able to view something like the below image in the Viewer tab in RStudio.
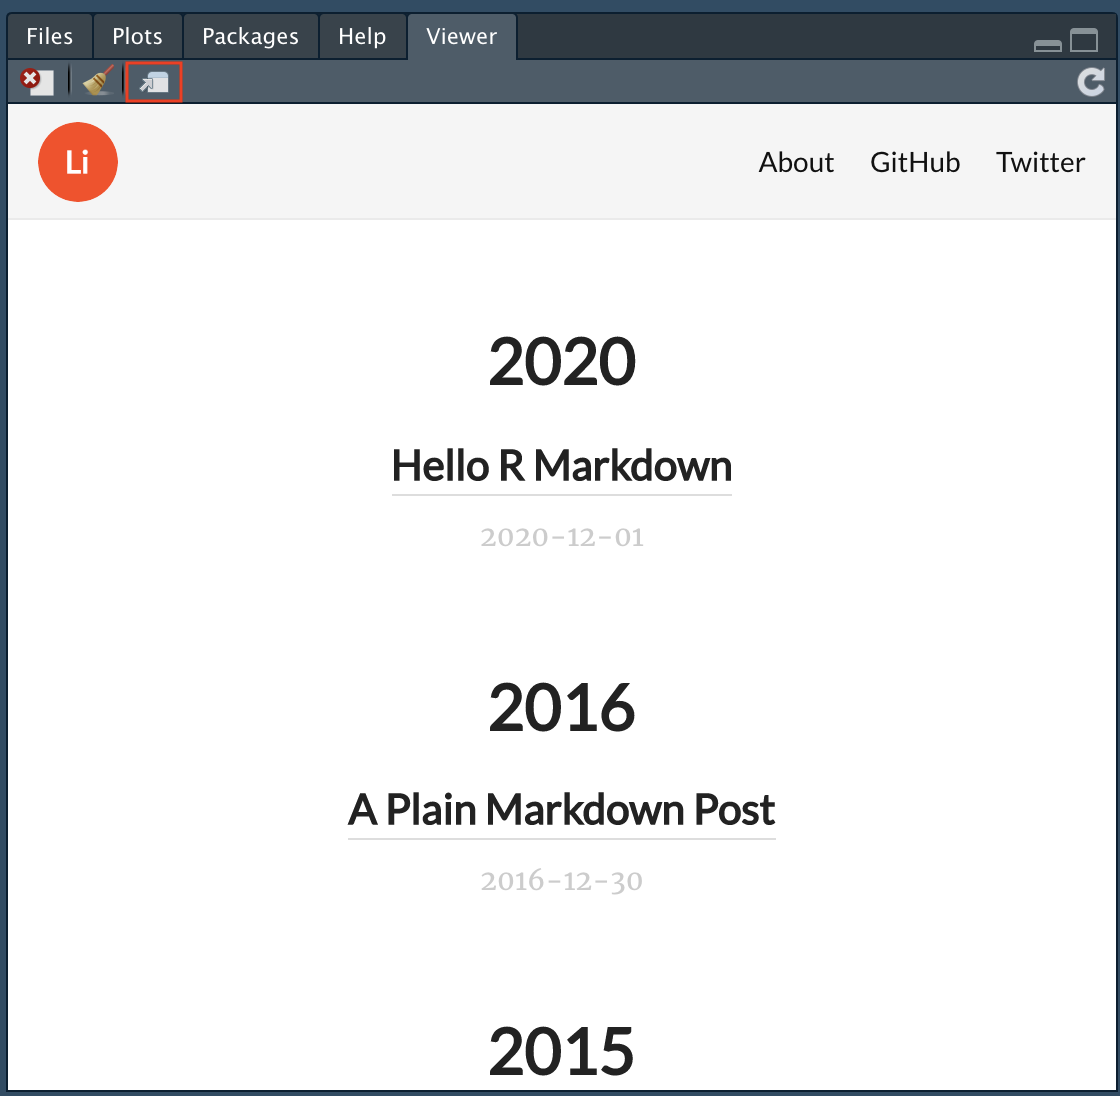
You can then click the button in the upper left hand corner of the visualization to view your website in a browser. This isn’t yet a live website, simply a local visualization of what your website will look like once it’s hosted.

108.4 Initial Configurations and File Structure
In the Files tab, you should see something like the below image. Exact files and configurations may change depending on the theme chosen when executing new_site().
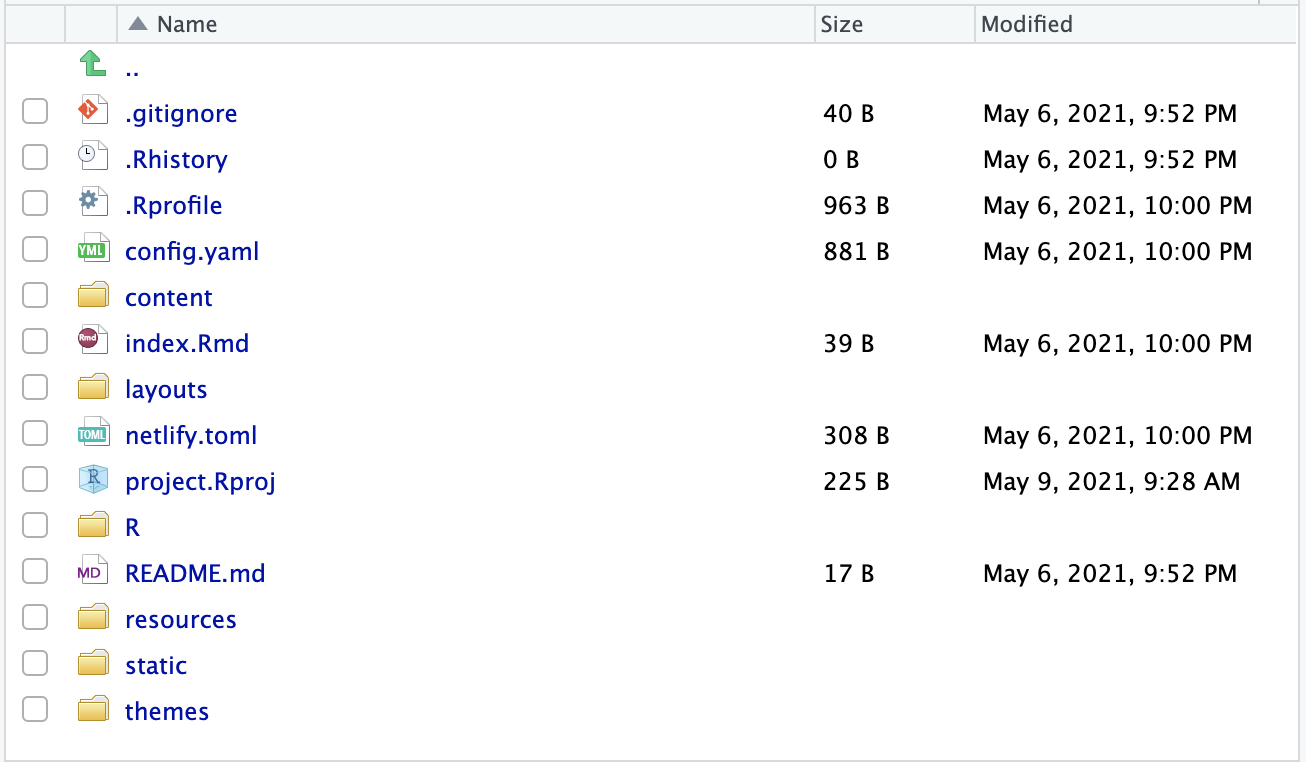
In config.yaml (config.toml if you switch to format = "toml"), you will find several parameters that dictate aspects of your website’s overall appearance. Some of the basic ones you may want to update initially are (from top to bottom): title, menu > main > name and url (to update the menu in the header), and logo. A logo image can be stored under main directory/themes/hugo-lithium/static/images and then referred to by its file name in the config.yaml file.
The main content of your website (in this case, blog posts linked from the main page) is found under main directory/content. This is where you can update the About section and add any markdown files you wish to showcase on your website.
This is the most simple version of a blogdown site, built using the hugo-lithium theme. For full documentation on the default site’s set up and customization, see the official blogdown book.
Another theme that might be useful to those working in an academic context is hugo-academic. You can create a blogdown site using this theme by using theme = "gcushen/hugo-academic" when calling blogdown::new_site() for the first time (along side any other desired arguments). If you’re looking to switch to this theme after trying the default theme originally, you will have to remove all of the old website’s files from your directory first and then call new_site() (you can delete anything you don’t wish to transition to the new site, and simply move any content you wish to keep to a different directory until the new site is set up).
hugo-academic is a website template built specifically for showcasing yourself and your work as an academic, such as a professional headshot, publications, experience (CV), contact info, and any other work that contributes to your portfolio. You can view an example here. Another option for showcasing academic work is to use distill or postcards, covered in Section 105. Much of the initial configuration and file structure is similar, but slightly more complex than the default hugo-lithium. I find the best way to get to know a new template is to play around with the files yourself as much as possible. Remember, as of right now, your website it only hosted locally so there are no repercussions if a file gets messed up or some of your code does not execute properly.
108.5 Making your website public
Once you are happy with your blogdown website as it appears in RStudio and the browser preview, you can set it up to be hosted publicly on the internet. There are several ways to do this, but we will look at one (free) way to do so using Netlify.
108.5.1 GitHub
The first step is to commit your changes to the GitHub repo you created for your website R project. This can be done via the command line or the Git tab in RStudio. It is important to capture your blogdown code in an online repository so it can be accessed by Netlify (along with all the other benefits of storing your code in a repo).
108.5.2 Netlify
Then, go to the Netlify website and create an account or log in with your GitHub account. Netlify connects directly to your website’s GitHub repo in order to deploy your website, which makes it very simple to create and update your website. To do so, click the button that says New site from Git. You will be prompted to choose a Git provider (select GitHub), then choose your website’s repository, and finally choose some settings for your new public site. Once you’ve completed these steps, click Deploy site, and your website will be public!
You can now play around with certain features like domain name and security, and any features or updates you push to your GitHub repo should be automatically reflected on your public site thanks to Netlify’s GitHub link.
108.6 Next Steps
Themes play a rather significant role in the functionality of a blogdown site. If neither hugo-lithium nor hugo-academic seem appropriate for your purposes, try some of the other themes available from Hugo that can be found here (not every Hugo theme has been tested with blogdown, so be sure to double check that your site is functioning as intended).
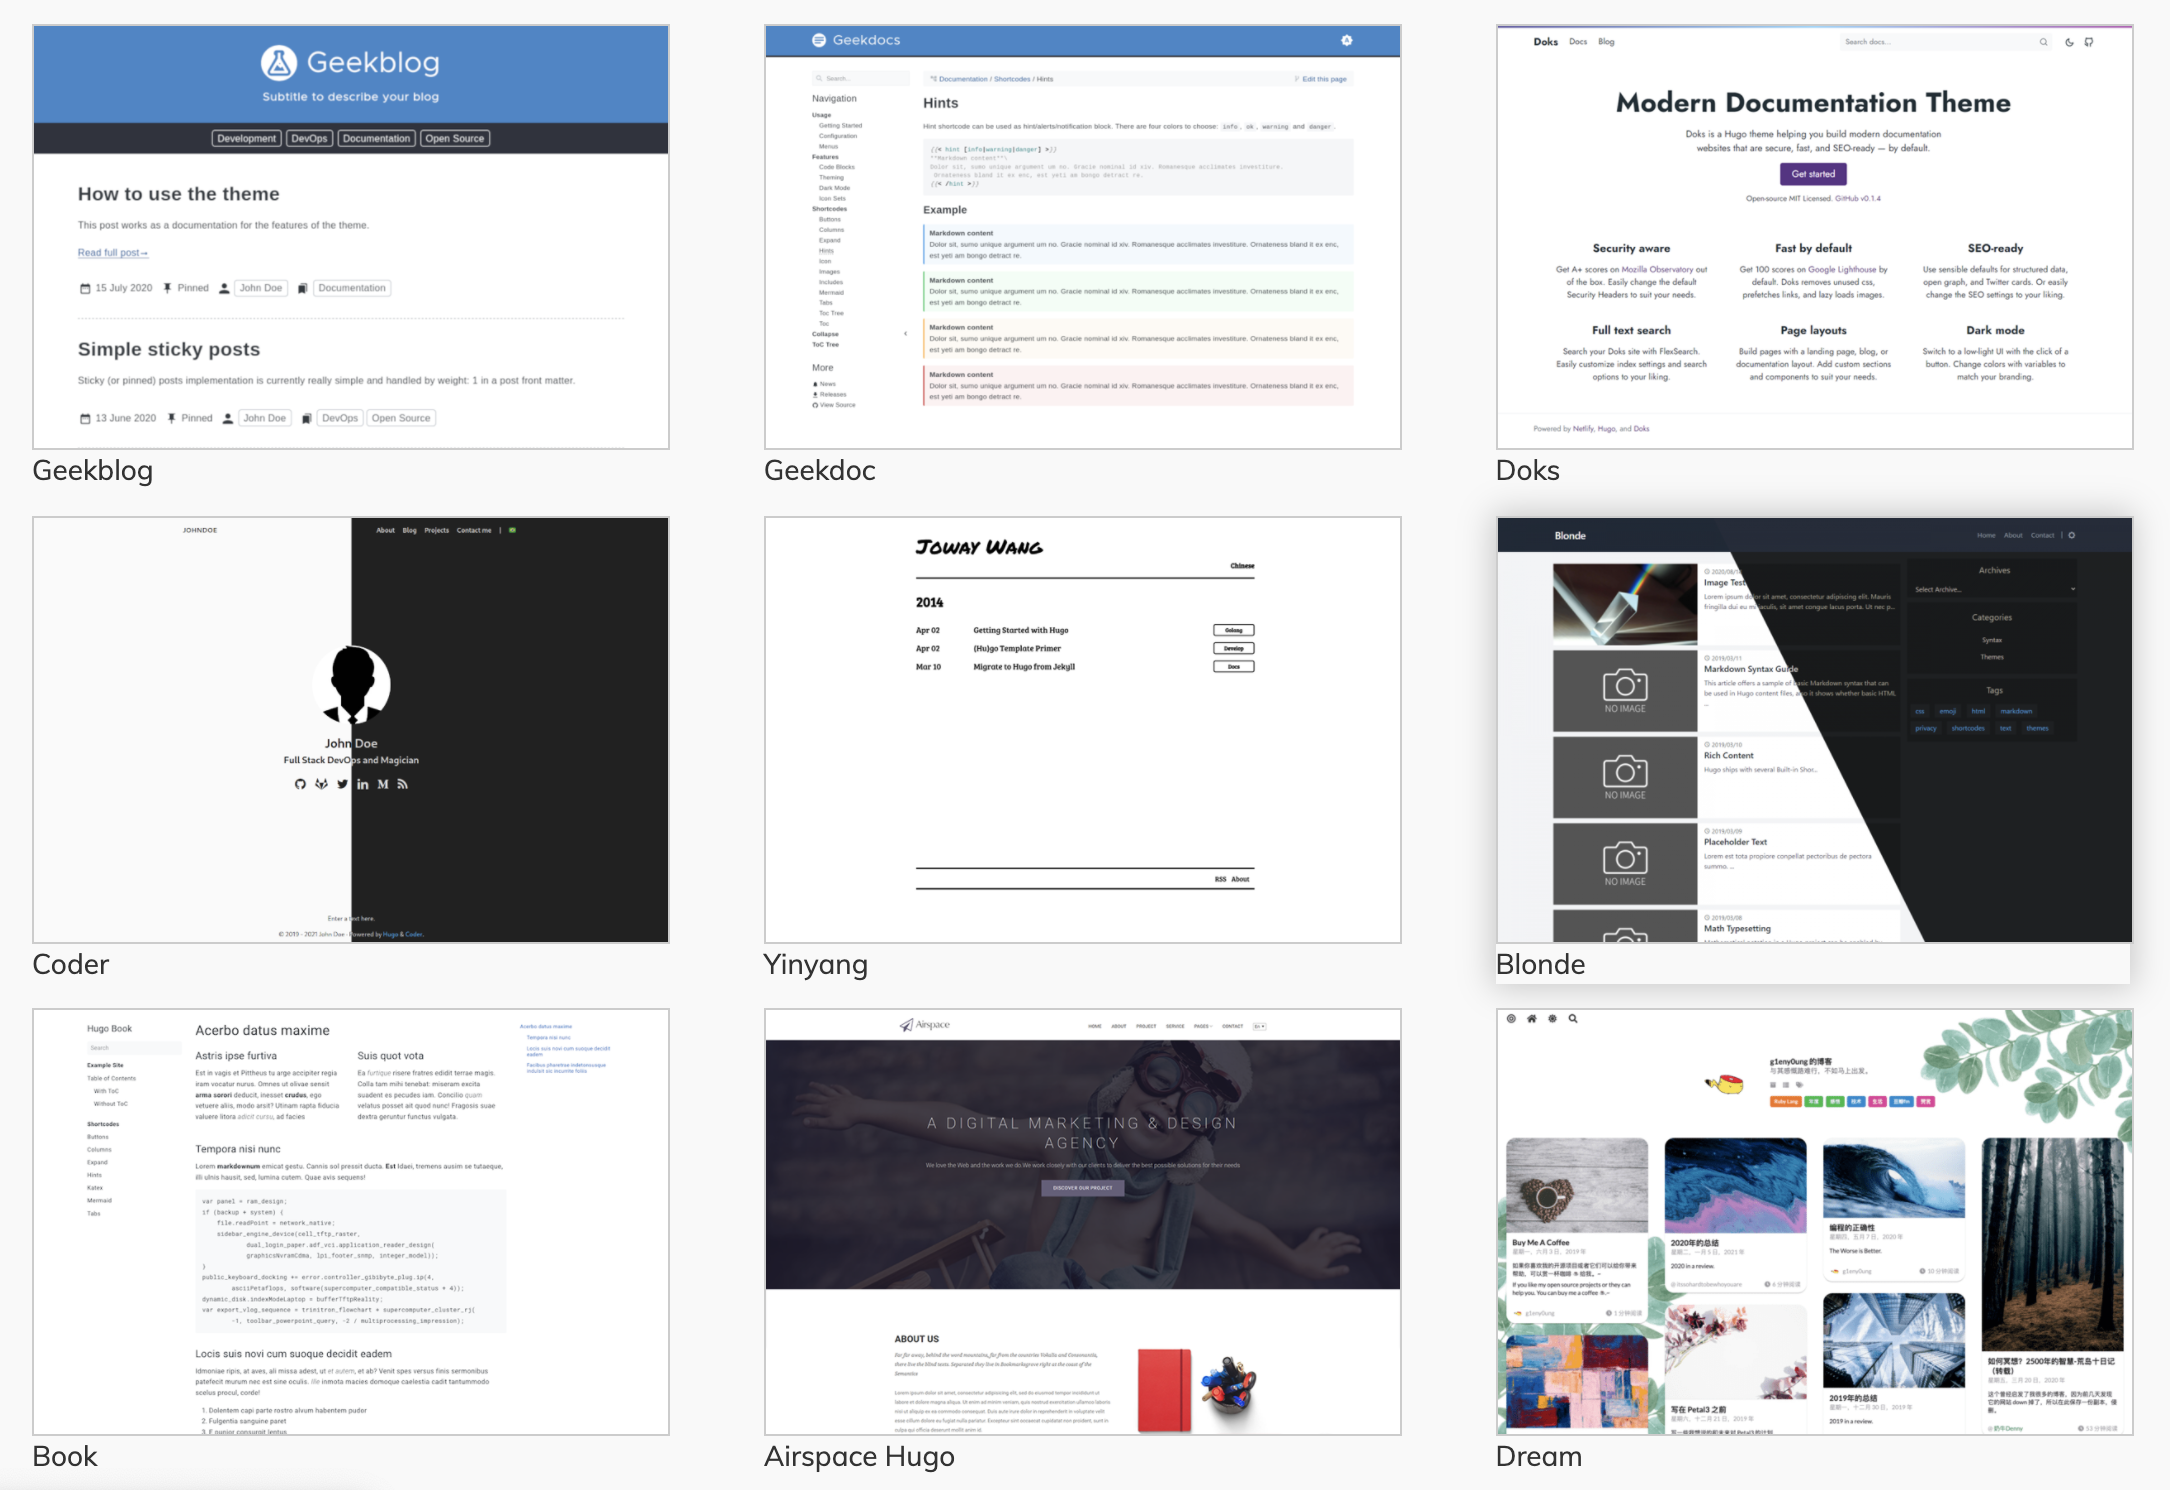
Figure 108.1: Source: Hugo
As mentioned previously, the best way to get to know your blogdown website is to play around with different files and configurations to discover what goes where and which set-up works best for you. As you build your website and try different themes, be sure to explore your Files tab and config.yaml file to get the most out of your new website.
For a more in-depth look at all things blogdown, check out the blogdown online book authored by Yihui Xie, Amber Thomas, and Alison Presmanes Hill outlining several more aspects of creating, updating, and maintaining blogdown websites.
If you are interested in more website building options, we will cover two more formats in Section 105: Distill and postcards
108.7 Exercises
108.7.2 Question 2
On what platform are Blogdown websites automatically deployed when built?
- GitHub pages
- Netlify
- Wordpress
- Blogdown websites are not automatically deployed
108.7.3 Question 3
Which of the following best describes Hugo?
- Hugo is the author of the
blogdownpackage - Hugo is a static website generator
- Hugo is a platform for deploying websites
- Hugo is a
blogdowntheme
108.7.4 Question 4
What information is indicated in the config.yaml file?
- Website theme
- Main menu titles and links
- Logo
- All of the above
108.7.5 Question 5
Which of the following is true?
- Executing
blogdown::update_theme("hugo-academic")will switch a Blogdown site from the default theme to the hugo-academic theme - Executing
blogdown::new_site()in a repository that already contains a Blogdown site will automatically overwrite all existing content to produce a new default site - Executing
blogdown::build_site()in an empty repository will create a Blogdown site with the theme hugo-lithium - Executing
blogdown::new_site()in an empty repository will create a Blogdown site with the theme hugo-lithium