107 Writing R Packages II
Written by Matthew Wankiewicz and last updated on January 5th, 2022
107.1 Introduction
After creating your first R package, you will likely want to share it with others and will need to make instructions for how to use functions in your package. This is where pkgdown and vignettes come into play. pkgdown is an R package which creates a website for your package, showing users the functionality of it. Vignettes are instructions for using your package. Most packages in R will have vignettes created and you can access them using browseVignettes("package"). Using this function will open up a window which contains the vignettes for the package.
Another important step in the package making process is testing. Testing ensures that your package is working properly by telling you if there are any functions which don’t work as intended. A common package to use for testing is testthat.
In this module, we will first look at how to make vignettes, then compiling these vignettes on a pkgdown site and finally the steps for testing your packages.
107.2 Vignettes
A vignette is a set of instructions for users on how your package works. These instructions can show unique situations where your package works best, or just give an overview on how to use the package. You can also use vignettes to tell users how to avoid common errors with your package or what they should do if they encounter an error.
The first step for making vignettes is installing the usethis package and running usethis::use_vignette("vignette_name"). This will create a directory which will contain your vignettes and edit your description to show that you have vignettes.
After running the code chunk above, you will find a sample vignette in the “vignettes” directory. This vignette will be a template for how you should format your vignettes. You can edit it and copy its format to create other vignettes.
Once the sample vignette has been customized to suit your package’s functions, you can create more vignettes by creating new R markdown files. You can either copy the format from your first vignette or when creating a new R markdown file you can select “From Template” on the pop-up window and then select “Package Vignette.” This will make another sample vignette file that you can customize.
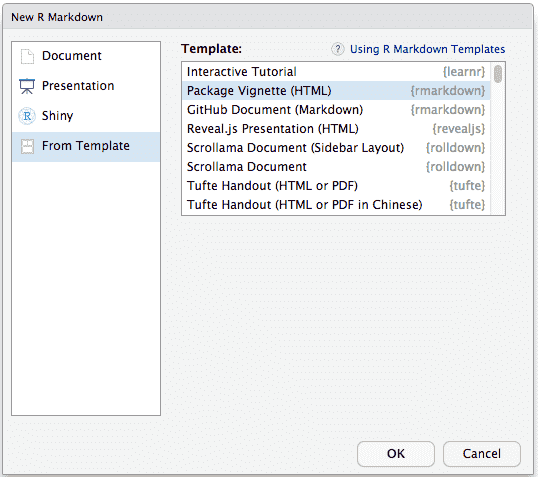
Example of the Template Window for R markdown. Image from the “R Markdown Cookbook.”
In the header of the file, you can change the title and add a spot for the name of the Author and when the vignette was written (Note: When changing the title, you must do it on the line that says “Title” on line 2 and on the 7th line inside the brackets of “%VignetteIndexEntry{Vignette Title}”). After editing the header, you can start writing about your function, with examples of how it works, including topics like what changing an argument does to the function. To write these examples, you can insert code chunks which either run the function or simply show the function.
To create a code chunk which does not run the function, add include eval = FALSE into the R chunk title. This will allow you to run the chunk in the .rmd file, but will not run it when the file is knit. This is useful for when your function doesn’t have an output or creates a new file, as it will just show what to write instead of running it.
A code chunk with `eval = FALSE` will look like this. You can place anything in the chunk and it will not runOnce you have written your vignette, you can knit it to ensure that everything is running properly. You can then repeat the process until you have written vignettes for all parts of the package you want to explain.
107.2.1 Sample Process
The sample process for creating vignettes can be seen below:
- Go to the project for your package.
- Run
usethis::use_vignette("vignette_name")to set up the vignette folder. - Customize the sample .rmd to contain information for your package.
- Make more vignettes by either copying and editing the entire sample .rmd file or by creating a new R markdown file and using the vignette template.
- After you’ve made vignettes, you can save your package, clean and rebuild and then push it to GitHub. You can then install the package and use
browseVignettes()to see your vignettes. (You can also check your vignettes by knitting the .rmd file.)
107.3 Making a pkgdown website
pkgdown websites are free and are compiled from your vignettes. When you create the website, it will have a home page and reference/article pages. The home page will be the README for your package and is where users will find things like descriptions of your package, installation instructions, and what to do when you encounter errors. The reference/article pages are where your vignettes will be located. This can either be split up by function or by the idea you are trying to display.
To create a pkgdown website you will need to use the usethis and pkgdown packages. From the usethis package you will need the use_pkgdown function. This function will create a file for configuration of the website and will add any missing files needed to make the website. You do not need to add any arguments to the function, simply run: usethis::use_pkgdown.
After your package has been set up to become a pkgdown site, you can run pkgdown::build_site() to create your website. This will go through all of the files and compile them into a website for you. Some examples of pkgdown sites include:
- The
pkgdownwebsite: https://pkgdown.r-lib.org/ - The DoSS toolkit’s website: https://dosstoolkit.com/
If you want to change any part of the website, all you need to do is edit the README to edit the homepage or edit the vignettes.
If you have a logo for your package, pkgdown will automatically add it in to the homepage. If you don’t have a logo, you can add one to your package by inserting the line of code below into your README. You can save your image into the “man” folder, where your function documentation is located.
# PACKAGENAME <img src="man/figures/hexsticker.png" align = "right" />
Usually, the logo/sticker will be hexagon shaped and you can make them using the hexSticker package.
If you have recently made changes to your package and want to advertise them on your website, you can add a news file called “NEWS.md” to your package. If pkgdown sees that you have a news file, it will add it to the website under a tab called “News” on the header of the website.
107.4 Testing
Testing is an important step in the creation of an R package, and should be done as frequently as possible. When testing, you will be able to find any bugs or issues with your package. Being able to find these issues as soon as possible is important because it will confirm that all of your functions are working properly, and will save you time in the future if any bugs appear.
A simple way to test a package function is a manual test in the console. You can do this by writing your function in the console and seeing if the output you receive is the same as the one you expect. If it does not match, you will need to change your function’s code. If the function passes that test, you can move on to testing different cases.
Testing your package’s functions one-by-one is extremely time consuming, especially if you have many different functions and test cases To save time, we can use the testthat package. To use testthat, we will run: usethis::use_testthat().
Running the line of code above will create a folder and file which will hold the tests for your functions.
- Once you have the test folder created, you can create separate files to test each function. Each file should start with “test.” For example, if you were testing the
meanfunction, you could name the file “test_mean.”
When creating tests for your functions, you start by using the test_that function. Inside the function you will first write what you are testing, such as “testing the function returns the correct length.” After writing a short description, you can use the expect_ functions which run the function, find the output and see if they match up with what you expect it to return. For example, if you tested the nchar function that tells you how many characters are in a string, you can use the expect_equal function as a test. The code chunk below shows how you can format a test for nchar.
test_that("nchar returns the correct number of characters",
          expect_equal(nchar("abc123"), 6))
#> Test passed 🥇
If your function passes the test, you will get a message saying “Test passed.” If your function fails the test, there will be a message alerting you of the failure and what went wrong. If we changed the 6 to a 5 in the chunk above, the message would say that there was a mismatch and will tell you what the nchar output yielded.
test_that("nchar returns the correct number of characters",
          expect_equal(nchar("abc123"), 5))
#> ── Failure (???): nchar returns the correct number of characters ───────────────
#> nchar("abc123") not equal to 5.
#> 1/1 mismatches
#> [1] 6 - 5 == 1
#> Error:
#> ! Test failed
There are many other types of expect_ functions, including ones that look for errors, or that the functions output matches a certain string or number. More functions will be discussed in the testthat lesson.
After you have created tests for your functions, you can write devtools::test() in the console and your tests will be run. While running your tests, the function will tell you how many functions passed or failed and if they do fail, why they failed.
Overall, the steps for testing functions in your package are:
- Run
usethis::test_that - Create test files for your functions
- Test various cases (looking for errors or ensuring the output is correct)
- Run the tests and see if there are any errors.
107.5 Common Issues or Errors
The most common issues that occur when working with vignettes are issues with knitting the R markdown files. To prevent these issues from occurring, you will need to look at any error messages and make sure the error is avoided. If you have a chunk of code which has an error and you don’t want it to be run, add eval=FALSE to the header. If you want the code chunk with the error to run, you can add error=TRUE.
When making pkgdown sites, you may run into errors with the building of the site. This can be avoided by installing certain packages or downloading programs which help the building process. In most cases, the error will tell you that a package is missing (like this one). To fix this, you need to install any package that is missing.
Issues and Errors for testing will be covered more in-depth in the testthat module but for the most part, the most common issues will be arguments missing (such as descriptions or expectations for testing). Another issue that occurs are warnings, the solution changes depending on the case and are usually explained in the warning message.
107.7 Next Steps
Some helpful websites for making vignettes include:
- The vignette chapter from the R package book: https://r-pkgs.org/vignettes.html
- The vignette chapter from the Bookdown book: https://bookdown.org/yihui/rmarkdown-cookbook/package-vignette.html
Some helpful websites for making pkgdown websites are:
- The pkgdown website: https://pkgdown.r-lib.org/index.html
- An R-bloggers site on pkgdown: https://www.r-bloggers.com/2017/08/building-a-website-with-pkgdown-a-short-guide/
Some helpful websites for testing R packages are:
- The testing chapter of the R packages book: https://r-pkgs.org/tests.html
- The pkgdown site for
testthat: https://testthat.r-lib.org/
107.8 Questions
- True or False, any package can have a vignette?
- True
- False
- True or False, you have to pay to make a
pkgdownwebsite?
- True
- False
- What file is the “Home” page on a
pkgdownwebsite?
- Your first function’s file
- Your description file
- Your README file
- None of the above
- What type of file are vignettes?
- R script
- R markdown
- R Shiny app
- Text file
- True or False, packages must have tests in order to work?
- True
- False
- Why are tests important for packages?
- They are needed for the package to run
- They make it easier to share
- They save time by finding potential bugs or issues
- Tests are not important
- Which command prevents R chunks from running in your vignettes?
dont_run = TRUEeval = FALSErun = FALSEskip = TRUE
- True or False, there is a limit to the number of tests you can include in a package?
- True
- False
- What is the best test file name if I am running tests on the
sdfunction?
sdtest_sdtest_filesd_test
- True or False, you can include package logos on your
pkgdownwebsite?
- True
- False