106 Writing R Packages
Written by Matthew Wankiewicz and last updated on 7 October 2021.
106.1 Introduction
While working on projects, you may get to the point where you want to create your own package in R. This package could be as simple as containing a temperature converter between Fahrenheit to Celsius or could contain a web-scraper which helps you get data you would like to analyze. This lesson will help go over the basics of creating a package in R.
Before we begin, be sure to have the devtools and roxygen2 packages installed as they are very useful when creating packages.
While there are a few different ways to create package in R, the method we will look at in this lesson is great for getting started.
106.2 Steps for Making a Package in R
After you have installed
devtoolsandroxygen2, create a new R project, then click new directory and then R package. Here you will name your R package and include any files to the creation of the package. Once you have selected any files, click “Create Package” to make the package.-
Now that the package has been created, there will be files located in the lower right-hand corner. The files include: “DESCRIPTION,” “man” and “R.” “DESCRIPTION” is where you can tell users about your package, including the name, description, and author. Next, the “man” folder is where you describe the functions in your package. These files are saved as “.Rd” files which stands for R documentation. The descriptions include the name, usage, description and a few examples of the functions. Lastly, the “R” folder will contain R scripts where you will write your functions.
- You can create as many functions as you want, just make sure that there is a “.Rd” file for each of the functions you have created.
- You don’t need to edit the .Rd files on your own. The
roxygenpackage can create this documentation based off of your functions. This is shown in the video later on.
-
Once you have written your functions, you can install your package to your R by using Cmd + Shift + B for Mac or Ctrl + Shift + B for Windows. Once the package has been installed, you can test out your functions to make sure they are working properly. If your functions work fine, you have successfully created a package in R! Now you can either upload the code to GitHub for others to look at or you can continue building onto your package.
- If you plan to add functions from other packages into your package, make a new heading in “DESCRIPTION” called “Imports” and list the functions you are adding in.
There are other ways to create packages which are more advanced than the steps I have detailed, more information about these steps will be included in the “Further Reading” Section.
106.3 Each Section of Packages in depth
Description: The description file will look similar to the one below:

Filling it out is fairly simple and when you first enter this file, it will tell you what you should enter for each heading. For the license you can pick whichever one you want (located here), the most common ones are MIT and Apache.
Man folder: The “man” folder will look similar to the one below:

For each \topic{} you should fill out the corresponding topic of your package in the {}. In \usage you should enter in how to use the function you’re describing. In \arguments enter in the arguments and a brief description of the argument, each argument should be separated by \itemn where n is the number of the argument. \examples includes examples of your function in action. While you can fill this out on your own, roxygen can do this automatically.
R folder: The R folder is where you place your functions. Each function will be contained in separate R files. You can keep all of your functions in one R file, it just helps to keep things organized if you have a file for each function.
The inside of the files will look like the image below:
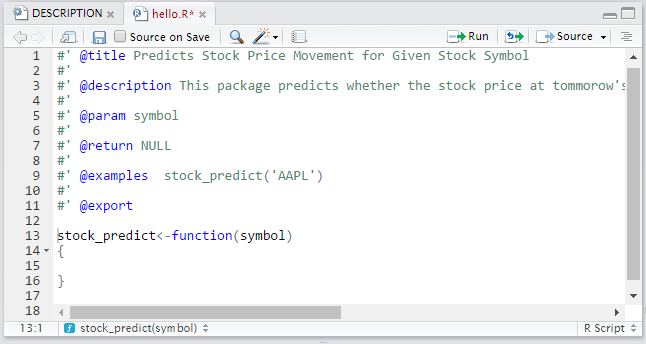
Photo from Analytics Vidhya
For @title you should write the title of the function, @description is where the description goes, @param is where your parameters go, @return is what your function returns and @examples are examples of how to use the function. Below that part is where you write out your entire function. This should be repeated for every function you plan to include in your package.
NAMESPACE: The NAMESPACE file is a more advanced file for making R packages. From the R Packages book from Hadley Wickham, it says that this file is “not that important if you’re only developing packages for yourself. However, understanding namespaces is vital if you plan to submit your package to CRAN.” NAMESPACE files can also be created automatically from roxygen.
106.3.1 After you have filled out each file
Once you have filled out each file with your functions you are now ready to build your package. To do this, go to your menu bar and select “Build” and then “Configure Build tools….” Once you have selected this there will be a new window that opens which includes options for the package. Check off the box that says “Create documentation with Roxygen” then select all checkboxes and click “OK” if another window appears. You can also type in “-–as-cran” into “Check Package,” this will let R conduct tests to simulate your package being checked/tested in CRAN.
- Creating documentation with Roxygen takes information from your functions and creates documentation from it. It is also able to create a NAMESPACE file. In order to do this, make sure you have your NAMESPACE file deleted so Roxygen can make a new one and don’t make any R documentation for your functions, Roxygen can do it for you.
Now you can go back to “Build” and then click “Clean and Rebuild.” This will restart your R session and load in your package to R. Now you can test out your functions to make sure they are working properly. If your functions work without error, you have successfully created your package!
106.4 Live Coding
Video displaying live coding of an R package:
To get your access token from GitHub use usethis::browse_github_token, it will open up a new page and you can access a token from GitHub there. It will also tell you how to store your token after running the function. (This is also covered in the GitHub lessons.)
106.6 Next Steps
Some next steps for making packages include:
- The R packages book by Hadley Wickham and Jenny Bryan: https://r-pkgs.org/
- The CRAN documents on writing packages: https://cran.r-project.org/doc/manuals/r-release/R-exts.html
106.7 Questions
- True or False, you need a GitHub account to create an R package?
- True
- False
- True or False, you can include examples of how your function works in the function files?
- True
- False
- Which folder does R code go into?
- R
- man
- description
- None of the above
- True or False, there is a limit to the amount of functions you can include in an R package?
- True
- False
- True or False, the only way to share your package is through CRAN?
- True
- False
- Which package creates documentation based off of your functions?
tidyverseroxygen2devtoolsggplot2
- Which line of code will open up GitHub to access your token?
usethis::browse_github_tokendevtools::browse_github_tokenusethis::get_github_tokendevtools::get_github_token
- What is the use of the “Imports” line in the description file?
- It tells R what you want to name your package
- It tells R that you are using functions from other packages
- It tells R who the other creators of the package are
- None of the above
- True or False, the NAMESPACE file is important for submitting packages to CRAN?
- True
- False
- True or False, the NAMESPACE file is created by the
roxygen2package?
- True
- False